No-download, no-install, dead-simple Windows 10 DLNA server
July 08, 2021 in digital music by Dan Gravell
![]() Occasionally we have a need for a way to share music around our home. Maybe you want to test a new device, like a smart TV or networked speakers. What you need is a dead simple way of sharing music around your home so you can put your new device through its paces. It just so happens there’s a free, no-install, no-download solution baked into Windows 10 itself.
Occasionally we have a need for a way to share music around our home. Maybe you want to test a new device, like a smart TV or networked speakers. What you need is a dead simple way of sharing music around your home so you can put your new device through its paces. It just so happens there’s a free, no-install, no-download solution baked into Windows 10 itself.
You might have wondered how all these devices from different manufacturers manage to share and play music around your home. Well, the engineers that build them don’t all sit down inside a massive lab and work out how each device communicates with each other device… that would be kinda crazy, not to mention completely unscalable.
Instead, a standard way way of communicating is agreed upon, and all the manufacturers build their devices to work with that way. Sometimes these ways are created de jure as the prescribed way of doing things and sometimes they emerge, often from successful implementations, de facto. Either way, when it comes to streaming music within a home network, DLNA (and its subsumed standard UPnP) are two of the most supported approaches.
Many devices allow DLNA browsing and playback out-of-the-box, so it’s the obvious choice to test your new device. And, as you want to get up and running quickly, this no-download, no-install solution on Windows 10 should be very useful!
It’s not a free lunch though. The Windows 10 DLNA server has a number of issues, for which I’ve tried to suggest a few remedies. Still, the simplicity of using an app bundled in Windows may be enough to make this worth it.
Setting up the Windows DLNA server
Let’s skip through a fast-as-possible installation and setup of Windows DLNA server.
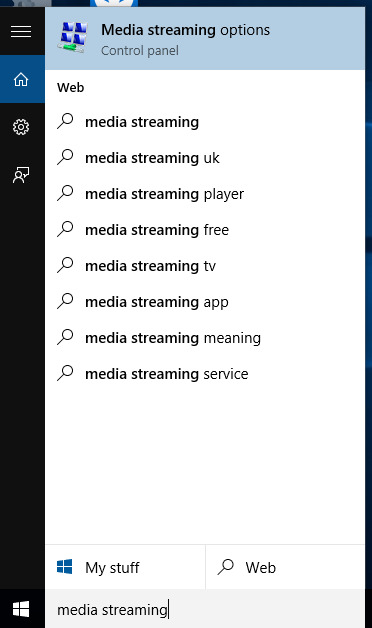
First, in Windows 10, click the search box in the taskbar and type “media streaming”. Click “Media streaming options”.
Now click “Turn on media streaming”. You can guess what this does. (It starts the DLNA server).
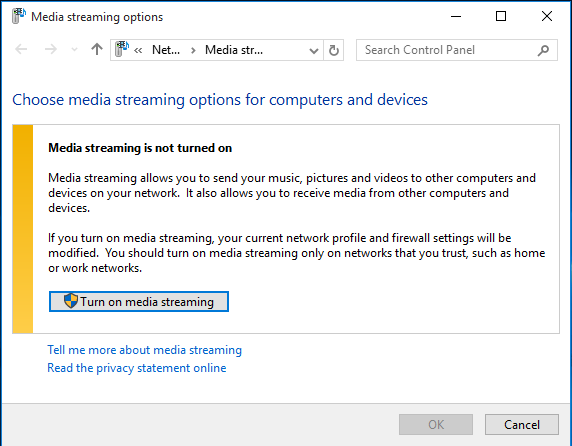
Once this is done you’re up and running. I told you it was easy! The page reloads to allow some customisation of who can access the server and what they can access, but this is limited and right now you probably just want to get something running!
Testing
If you’re impatient and want to get on with things, you can probably try accessing the DLNA server from your device now. Obviously, I don’t have access to your device, so you’ll have to improvise the next steps with inspiration from these examples…
In the screenshots below I’ve used the popular Android app BubbleUPnP.
Broadly, the first step is to allow your device to scan your network for servers. This might surprise you; you might find more servers than you were expecting, because some devices such as NAS drives or software such as music servers embed their own DLNA server. But amongst those, you should be able to recognise your Windows 10 server.
Here’s how it appears in BubbleUPnP when you scan for servers:
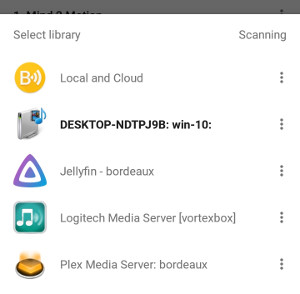
You’ll typically see the name of your Windows computer, then the name of the DLNA library (in this case: win-10). You can also see some other servers I have running on my network.
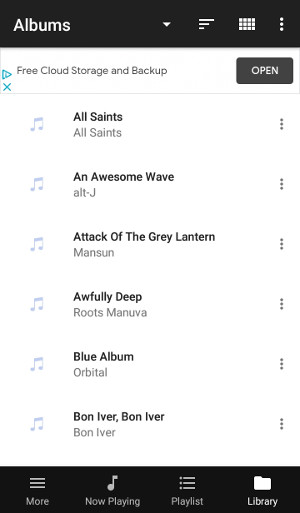
When you click on the server you will be taken to a menu through which you can browse your music. Typically, because DLNA supports all types of media, you click Music and then you can navigate songs, albums and more from there.
Problems with Windows DLNA
So far it has been a free lunch. No download, no install and a straightforward configuration!
But what we gain in terms of convenience can sometimes cost us in terms of functionality. There are some issues with the DLNA server in Windows. Read on if you want to fix these, but otherwise you might want to consider installing an alternative server if you are going to use DLNA or UPnP long-term. DLNA servers I recommend are:
These also run on platforms other than Windows 10, including macOS, Linux and earlier versions of Windows like Windows 7.
But in the meantime, and if you’re willing to persevere, here are some problems and their solutions…
Windows DLNA server runs very slow
When I was writing this article I did have one problem - initially the DLNA server would appear to clients, but then attempting to browse the folders presented by the server would hang and eventually not show anything.
First a warning: the Windows DLNA server is just a bit slow. Depending on your hardware, there might be a limit to the speed that you can achieve. For example, I find browsing albums gets slower the more albums you have in your library.
However, I also found that rebuilding the music library on the Windows 10 computer can make things a lot faster. To do this…
- Open command prompt - click the search box again, type cmd then right-click Command Prompt and click Run as administrator.
- In Command Prompt, type net stop WMPNetworkSvc and press enter to stop media streaming. Don’t close Command Prompt!
- If Windows Media Player is running, stop it.
- Open Control Panel - click the search box, type control and click Control Panel.
- Run troubleshooter - in Control Panel, search for troubleshooting and click Troubleshooting. Click Programs.
- Click Windows Media Player Library and allow the steps to run thrrough. You might see Media library is corrupted.
- Back in Command Prompt, restart media streaming: Type net start WMPNetworkSvc and press enter
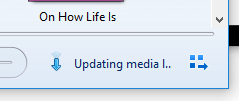
- Restart Windows Media Player and wait for music library to populate:
Now try connecting again from your DLNA client. For me, this showed an improvement in speed, although it was still a little… sluggish.
Tracks shown in the wrong order
When you connect a DLNA client (such as your device, a smart TV, smartphone app etc) to a DLNA server the client requests information about your media libraries. When you click “Albums” it lists all your albums, for example. When you click an album, it lists the tracks, and so on.
For albums, the track ordering that is returned is, by default, mandated by the DLNA server. The trouble is, the Windows DLNA server does not correctly order album tracks. It appears that the Windows 10 DLNA server orders tracks alphabetically, according to their track title.
Here’s an example in BubbleUPnP (a popular app for Android):
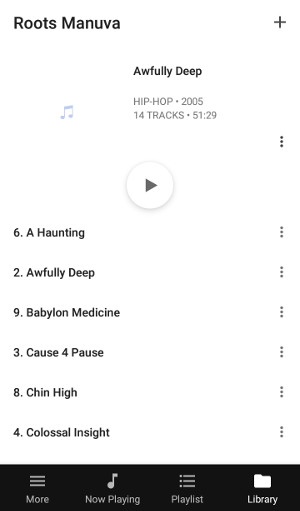
To illustrate the problem here I’ve enabled the BubbleUPnP setting to include the track number next to the title. By default, the track number is not shown.
You can’t fix this with Windows, it’s simply a limitation of the server code in Windows. However, your DLNA client may allow overriding of the ordering. For example, in BubbleUPnP, open settings, scroll to Individual UPnP/DLNA libraries settings, choose the Windows 10 library, then check Smart sort. This will order the tracks by their track number.
There’s a second workaround, but as I see my music library as all-important, I can’t recommend it; still, maybe it will help you out in dire circumstances.
To implement this, rename your track title tags, including the track number in the title. In the example above, the first track title is “A Haunting” (as described above, the “6.” prefix was added by an optional configuration setting in BubbleUPnP). Change that to “06. A Haunting” and all other tracks too. You’ll also want to disable any setting which was also showing the track number, because that will just repeat it. Here’s why I suggested “06” rather than just “6”.
Other than that, the only thing you can do is use a more advanced server.
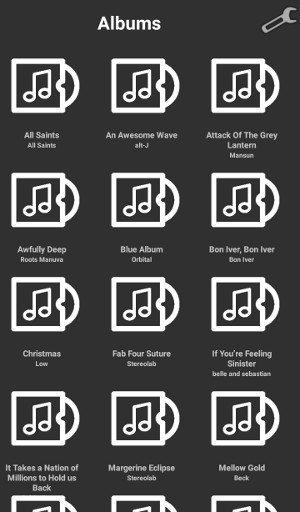
Album artwork not showing on the albums list
It’s a common refrain in self-hosted and self-stored music libraries - why doesn’t my music’s album artwork show?
You might see something like this when browsing your albums:
But then, puzzlingly if you click on an album:
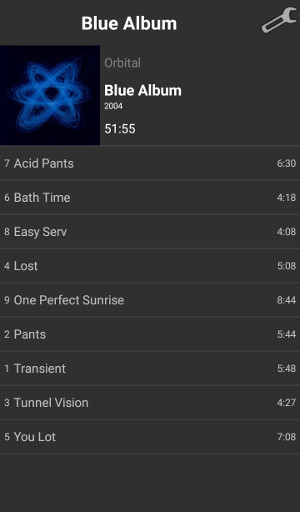
The issue here is similar to the track ordering one. DLNA clients tend to act fairly “dumb” and simply show the data they are presented. When the album list is requested, the Windows DLNA server simply doesn’t include the artwork. When the album details are requested, it does.
More advanced DLNA servers (again, see the list above) should fix this.
Disabling the Windows DLNA server
If your experiment is over and you’ve decided to move on from Windows media streaming, it’s simple to disable it.
- In the search box, type media streaming and click Media streaming options.
- Click Block All.
- Click OK.
I hope this has provided a nice quick and easy, if slightly limited, way of testing any new smart DLNA clients.


