Installing bliss on Solaris 11 Express
November 20, 2011 in bliss by Richard Rudd

I'm always keen to hear from people installing bliss on all sorts of different devices and operating systems. As bliss is a Java application, it is reasonably portable and is open to being run wherever a Java virtual machine is available.
A few weeks back, Richard Rudd took on the task of installing bliss on Solaris 11 Express. Solaris is a Unix-like operating system with an available Java virtual machine.
Initially, Richard hit a roadblock when he discovered bliss wouldn't even start on Solaris. However, after I added the play, pause and rescan buttons to bliss I also changed bliss so that it would start on any platform. That meant Richard was able to complete his installation, and run bliss on Solaris.
Richard went a couple of steps further and documented the process of installing bliss on Solaris. I've pasted his walkthrough below, with extra notes and screenshots taken by me where required.
Installing bliss on Solaris 11 Express
Firstly, a pre-requisite. A Java 6 JRE must be installed... however, given this is Solaris, it's highly likely you'll have Java already, and given Java 6 is really quite old now it'll probably be up to date too.
Now, if you visit the bliss download page, your first question would be, which version to download? The answer is the linux version. While the file pruports to be Linux only, it is in fact a cross platform JAR file and can be used on any system.
First, run the installer locally from the graphical desktop. Open a terminal and type:
$ sudo java -jar {path to bliss.jar}You'll get the install wizard:

If you do not run a graphical environment (or you just don't want to run the installer), then a console version can be run by appending -console:
$ sudo java -jar {path to bliss.jar} -consoleThe rest of this walkthrough will follow the graphical installer.
If you are accessing the Solaris machine remotely, perhaps a headless server, you can still view the installer by setting up XWindows forwarding.
Now, run through the standard installer. Click Next, accept the license and click Next. Now there's the choice of where to install bliss to. I install bliss into /usr/local/bliss because it is a daemon shared by all users. Once you've chosen, click Next.
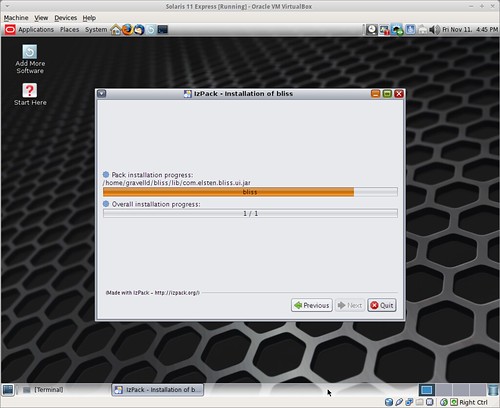
The installer will install the files to the chosen directory, click Next when finished. I don't bother with shortcuts (as I'm running bliss as a service) so I untick the option and click Next. Note that it looks like there's a bug here in the installer, it says it installed to the default directory even if you changed the install directory. Finally, click Quit when finished.
Create a Solaris Service Manifest file
Now I use a neat little tool called Manifold to generate the Solaris Service Manifest file (SMF). This isn't required for installing bliss on Solaris, but it wraps bliss as a service which means it can be set to run as a daemon on startup.
Manifold installation instructions are here. It's easiest to install setuptools first, if you don't have it.
Start Manifold as below:
$ manifold bliss.xml
Now I use the steps below to create my SMF, once Manifold is installed and running. This is a screen dump of all the questions Manifold will ask you, with my response emboldened. There's mostly no responses (meaning the default is accepted), as you can see...
gravelld@solaris:~$ manifold bliss.xml

The service category (example: 'site' or '/application/database') [site]

The name of the service, which follows the service category
   (example: 'myapp') [] bliss

The version of the service manifest (example: '1') [1]

The human readable name of the service
   (example: 'My service.') [] bliss

Can this service run multiple instances (yes/no) [no] ?

Full path to a config file; leave blank if no config file
  required (example: '/etc/myservice.conf') []

The full command to start the service; may contain
  '%{config_file}' to substitute the configuration file
   (example: '/usr/bin/myservice %{config_file}') [] /usr/local/bliss/bin/bliss.sh

The full command to stop the service; may specify ':kill' to let
  SMF kill the service processes automatically
   (example: '/usr/bin/myservice_ctl stop' or ':kill' to let SMF kill
  the service processes automatically) [:kill]

Choose a process management model:
  'wait'      : long-running process that runs in the foreground (default)
  'contract'  : long-running process that daemonizes or forks itself
                (i.e. start command returns immediately)
  'transient' : short-lived process, performs an action and ends quickly
   [wait]

Does this service depend on the network being ready (yes/no) [yes] ?

Does this service depend on the local filesystems being ready (yes/no) [yes] ?

Should the service be enabled by default (yes/no) [no] ? yes

The user to change to when executing the
  start/stop/refresh methods (example: 'webservd') [] bliss

The group to change to when executing the
  start/stop/refresh methods (example: 'webservd') [] staff

Manifest written to bliss.xml
You can validate the XML file with "svccfg validate bliss.xml"
And create the SMF service with "svccfg import bliss.xml"
Oh - also note I've installed the service so that it runs as a user 'bliss'. It's up to you whether you do this or not. I presume if you've read this far you probably already understand why it may or may not be a good idea!
Install the SMF and run bliss
Now change to the root user to verify and install the SMF.
$ su
$ svccfg validate bliss.xml
This shouldn't produce any errors, or else something has gone wrong. Now, import the service:
$ svccfg import bliss.xml
At this point it will try to start bliss, as we specified the default is for the service to be enabled. Check the status by issuing:
$ svcs -x bliss
If it claims to be running, check http://{your hostname}:3220 and check the logfile for the service to see if there were any errors during start up.
I usually see errors for writing to the log files, because by default java.io.tmpdir is set to /var/tmp and my user that the service runs as doesn't have permissions to write to the /var/tmp directory. The Java temporary directory can be overridden by setting the -Djava.io.tmpdir property in bin/bliss.sh.
Edit the bin/bliss.sh file to add -Djava.io.tmpdir=/usr/local/bliss immediately after -Xmx128M in the Java command line. Then restart bliss:
$ svcadm restart bliss
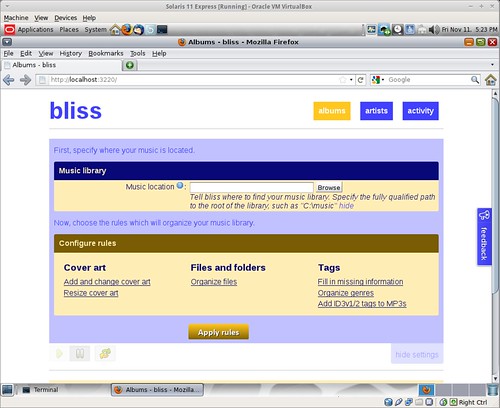
You should then see the bliss.log file created in the install directory and bliss is now up and running. Now connect to http://{your hostname}:3220 and configure bliss using the web interface. Here's how it looks on my machine:
Some final words
Make sure that the user your running bliss as has permissions to read and write to your music files so that it can update them.
Also note that Solaris doesn't support "inotify" for tracking file changes, so the pause/play buttons in bliss don't work and you have to manually press the rescan button when you want bliss to re-check your music library. This isn't a big deal for me as I usually add a whole bunch of albums in one go, then just rescan my library and let bliss do it's magic.
Thanks for that Richard!
Thanks to James Jordan for the image above.


