Organize music on your Windows Home Server : Installing bliss
September 04, 2011 in home server by Dan Gravell

What's the next step on from storing music on and playing music from your Windows Home Server? Organizing it, of course! And bliss, as a server side, fully automatic music organizer is ideal for the task. bliss is a server application that can be installed on a Windows Home Server and serves its user interface over the Web, so you can connect from anywhere in your home or even the world!
Why would you want to organize music on your Windows Home Server (WHS)? Don't music taggers already exist? Well, yes they do. And you can organize music on your WHS by running a music tagger on a different computer and connecting via a mapped drive or the UNC path to the shared music drive. The trouble is that this approach is not particularly efficient. Unlike streaming music from the WHS, tagging it tends to require the entire file being read and written back. Done across the network this can be slow, and is even worse if you are using a wireless network.
It's a truism of information science that it's much more efficient to process data as close to the data as possible. If your music is stored on your WHS, then it's best to organize and tag it there too.
bliss is a music organisation server which serves its user interface via the Web, so you connect to it with your normal Web browser. The basic steps to get up and running are:
- Run setup.exe to install Java and bliss
- Optionally install the Windows service
- Configure your firewall
- Run bliss and connect via your browser
Now, before I detail these steps in depth, here's a little caveat...
The curious case of Media Streaming Metadata Synchronizer
Something worth mentioning before we get started: Microsoft introduced a 'feature' into WHS 2011 which blocks bliss from doing-its-thang and, more generally, overwrites your music tags and album art.
The Media Streaming Metadata Synchronizer is a process that tries to be helpful; it checks your music files for missing information, filling in the metadata. Unfortunately, in some cases it overwrites existing tags, and in others it overwrites album art. In addition, the album art files it overwrites are subsequently set to system hidden files. This prevents bliss from updating the art in the event it is uncompliant.
If you've already disabled this, as many WHS users have had to do, you can go onto the next step. Otherwise, bliss's album art features won't be accessible to you, because of the way the Synchronizer changes album art files to be hidden.
To allow bliss to overwrite the art, you must remove both the system and hidden flags. But before that, disable the Media Streaming Metadata Synchronizer and then reboot. If you don't reboot the Synchronizer continues running!
Once rebooted, removing the system and hidden flags can be done on the command line using the attrib command. For instance, in the album folder for which a system hidden Folder.jpg file exists:
attrib -h -s Folder.jpg
The file is now editable by bliss.
Any regulars with a better idea, script or tool they use to do this en masse are welcome to post in the comments :-) .
Install bliss
bliss comes as a setup.exe file which must be executed directly on the WHS. Use Remote Desktop to gain access to the server, and download from the blisshq.com website or copy the setup.exe from a computer that has already downloaded it.
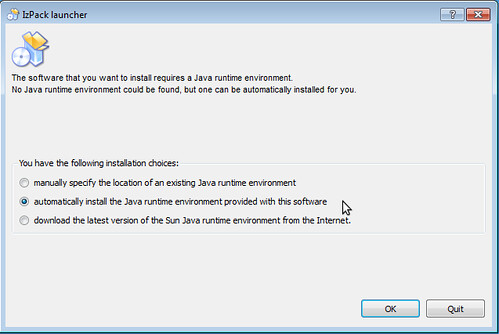
Once you've downloaded setup.exe, run it. The first thing the installer checks is whether Java is installed. bliss requires Java to run. If Java is not installed, it offers to install it for you.
All of these screenshots are taken from WHS 2011, the latest version.
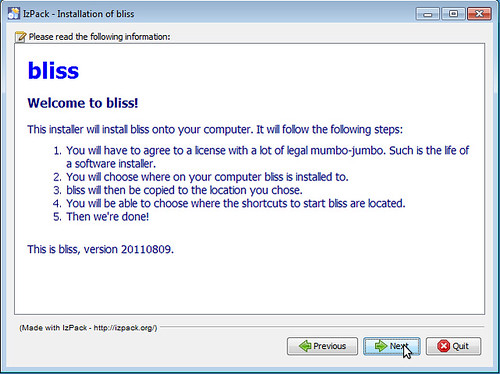
Once Java is installed (or if Java is already installed), the bliss installation begins:
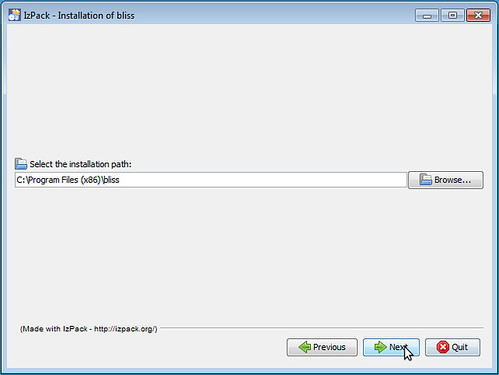
In the installer you get the normal options such as the path in which the program files should be installed. bliss will pick the system default.
One other item of note are the Start Menu items. bliss offers to create Start Menu items and a Desktop shortcut. These are normally most useful for users of desktop operating systems who want to manually start bliss when they need it. Whether you need desktop shortcuts or Start Menu items or not depends on your use of the WHS. Having to log into the WHS each time you want to use bliss may be tedious. Later, I introduce the Windows service which might be a more convenient way of starting bliss fully automatically.
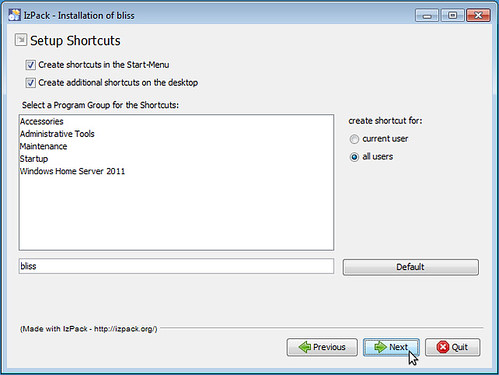
Once the few installation pages are answered bliss installs to the location you specified. If you decided to create the Start Menu items or desktop shortcuts you can now use them to start bliss. However, a more WHS-idiomatic approach is to use Windows services.
Run bliss at WHS startup: install as a WHS service
Windows services are applications that can be configured to start when your WHS starts, even before anyone logs in.
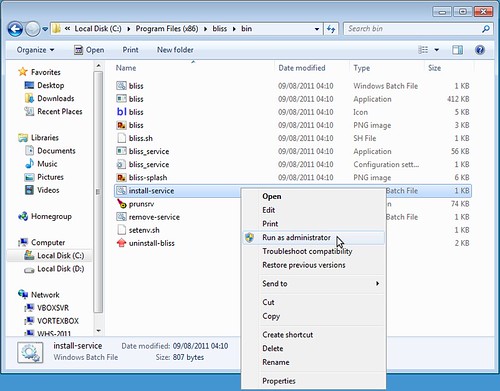
For more detail about the bliss Windows service read Installing bliss as a Windows service, but it's quite simple to install. Open Windows Explorer, find the bliss program files and execute the bin\install-service.bat file as Administrator (right click, Run as administrator):
The service will be installed:
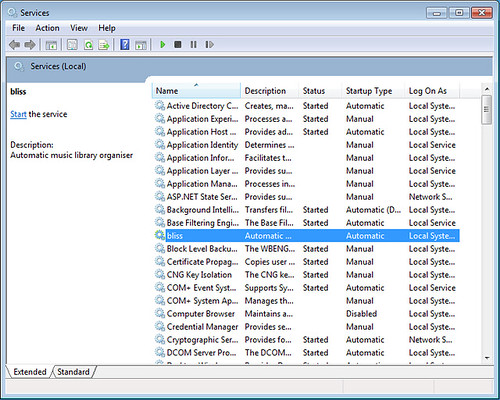
bliss can now be started via the services applet. In addition it will be configured to start automatically on WHS startup. If you don't want this, right click the bliss service, click Properties and change the Startup type.
Configure your firewall for bliss
You only need to do this if you intend to access bliss from another computer. You can, of course, stick with Remote Desktop, but that's quite inefficient. If you want to access bliss from a different computer or tablet on your network it's easier and faster to access bliss using a Web browser. Once this is done you should be able to access bliss by going to http://[whs]:3220/, replacing [whs] with the name or IP address of your WHS.
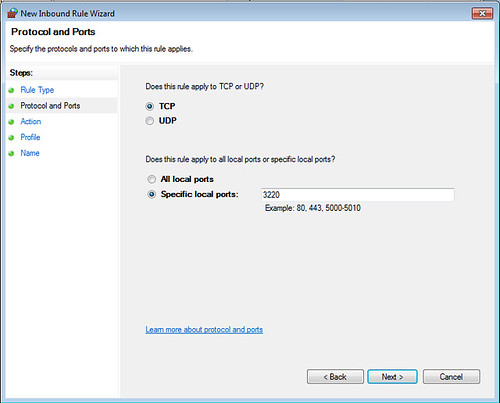
You'll need to configure your WHS to allow incoming TCP connections to port 3220. This is the port that bliss serves up its user interface on. Here's how to configure the firewall for WHS 2011:
Open Control Panel → Windows Firewall. Click Advanced settings and the Windows Firewall with Advanced Security application will start.
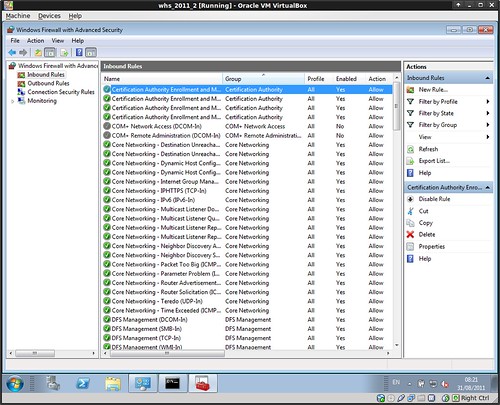
Select Inbound Rules and create a New Rule.... Create a Port rule and click Next. Specify TCP as the protocol and 3220 as the Specific local ports. Click Next.
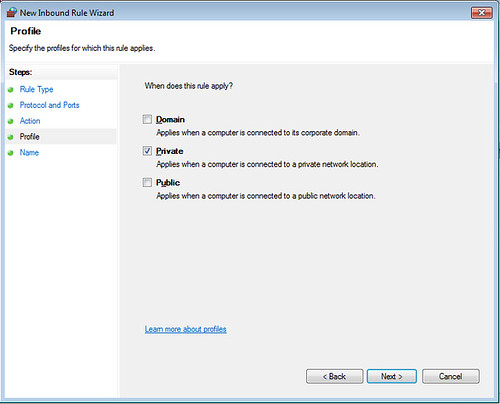
In the Action step, Allow the connection and click Next. In the Profile step you get to choose the source of the connections you want to allow. You might want this only accessible by computers on your home network. If this is the case make sure only Private is checked. Click Next.
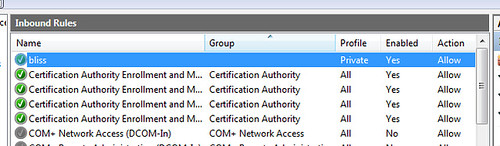
Finally, give the rule a name (just call it something like "bliss") and click Finish. The new rule appears in the list:
Assuming bliss is started, you should now be able to access it from another computer.
Setting up bliss for your WHS
Now that bliss is running you can either access it from other computers in your home network (assuming you configured the firewall as instructed in the previous section) or via Remote Desktop, running Internet Explorer on your WHS and connecting locally. The URL to connect is: their Web browsers. Go to http://[whs]:3220/ replacing [whs] with the name or IP address of your WHS. Here's what you'll get:
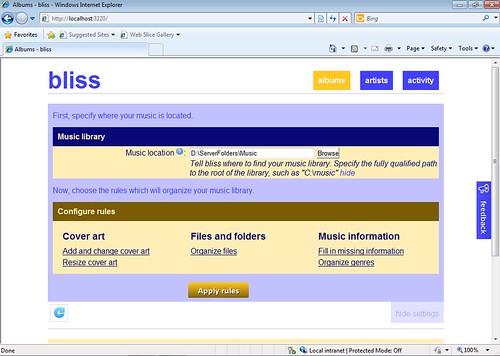
When you store music on your WHS, you normally do so in the D:\ServerFolders\Music folder, so configure your Music location appropriately. Other than that, setting bliss up doesn't differ greatly from other platforms. You configure bliss's rules to organise your music collection as you require. Find, embed or resize album art, consolidate genres or tag genres automatically and organise music files... it's up to you!
A final word on why I didn't write a full bliss WHS add-in
I looked at developing a bliss add-in for WHS for some time. Indeed, it is one of the few ideas I've declined on the bliss ideas forum. Here's why I decided not to do it:
Packaging Java applications in MSIs is inelegant. For starters, trying to install Java before bliss using an MSI is impossible because the Java installation is itself an MSI and only one MSI install can run at once. Further, a fundamental assumption of MSIs is that all files that will eventually be installed are visible to the MSI. To do it properly, therefore, requires the entire Java installation to be copied as files. This results in a very large installation archive (around 60MB including the bliss software!).
Building WHS add ins is a picky process. It's good practice to have an automated build that can build the bliss product with one click. Currently all versions of the product, Windows, Linux, OS X and Vortexbox are, indeed, built in this way on my Linux development machine. Unfortunately, MSIs must be built on Windows. There are ways to automate this, but it would mean booting a machine, copying the software to include in the build, running the MSI build, copying the MSI back and then shutting the build machine down again. This, in addition to all the other builds. This would be a lot of work to automate (although possible).
So, I decided that it would be just too much work for now. Knowing that bliss was still installable on WHS from the setup.exe meant I was not abandoning the WHS community entirely.
Go ahead and try bliss out for organizing music and finding album art on your Windows Home Server... I'd love to know what projects you get up to!
Thanks to letmehearyousaydeskomdeskom and [email protected] for the images above.


