First steps... a quick start tutorial
bliss is software to organise digital music libraries. It is aimed at completing missing information in your library and reducing inconsistencies to make your music collection beautiful. It saves you time by automating all of this as much as is both possible and desirable.
This is a quick start guide about using bliss to manage cover art. It begins assuming bliss has already been installed and is ready to start. The goals of this quick start guide are:
- Learn a little about how bliss works
- Learn how to configure bliss's cover art rule
- Learn how to add missing cover art automatically
- Learn of the basic screens in bliss
How bliss works
bliss is designed as a long running server application that applies rules to a music collection. There are two functions of rules:
- Assessment, which is judging whether your music is compliant or non-compliant
- Suggestion of automatic or suggested fixes.
Examples of rules are: whether cover art should be embedded, the file or folder name structure of your music collection, or what metadata should exist in your collection.
When first run, bliss applies the enabled rules to your entire collection on an album by album basis. The basic process is as follows:
- Each rule assesses whether the album is compliant against the rule or not
- If it's non-compliant, there may be an automatic fix. If so, execute it and re-assess.
- Show the resulting compliance in the user interface
Subsequently, bliss continues to apply the rules to any album that is added or changed (maybe a track is added or some of its details changed). This means, as a long running application, it can enable full automation of music collection organisational tasks.
Configuring bliss for the first time
Enough of the theory, let's get practical! The very first thing you'll want to do is install bliss. Download it by clicking the button below and running the installer. If you're using a Mac, you can just open the .dmg file and run that direct.

Once installed, start bliss from (Windows) the Start menu or desktop, (Mac) the Dock or the downloaded .dmg file, (Linux) the menu, desktop or the command line. Once started, visit the user interface (UI). Either click the bliss icon in the system tray or open a Web browser and point it to http://localhost:3220 ![]() (if you are running bliss on the same computer as the browser).
(if you are running bliss on the same computer as the browser).
You configure bliss using the 'settings' pane of the UI. The first time bliss runs the settings pane is automatically opened. Otherwise, click the 'settings' link on the home page and the settings slide down. The settings pane allows you to specify where your music is and allows you to specify and configure your rules.
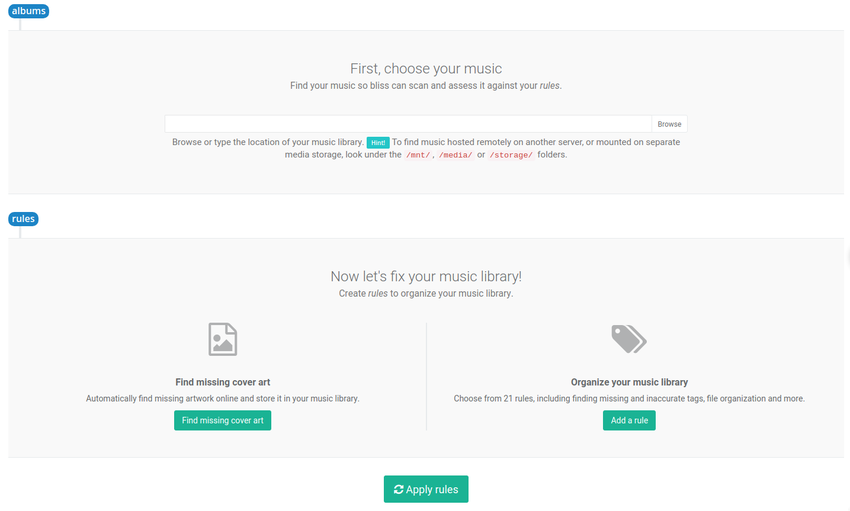
First, locate your music. This is the root folder of all your music files. For instance, you may have your music files in folders for artists or albums. Choose the folder that is the parent of those folders. On Windows and Mac, this will be pre-populated to the default music location, but you may wish to change it. Use the 'Browse' button to navigate through the folders on the computer bliss is installed on.
Now, time to configure our first rule. I said we would manage cover art in this quick start guide, so under 'Configure rules' click the 'Add and change cover art' link. This opens a new box for you to configure your cover art rules.
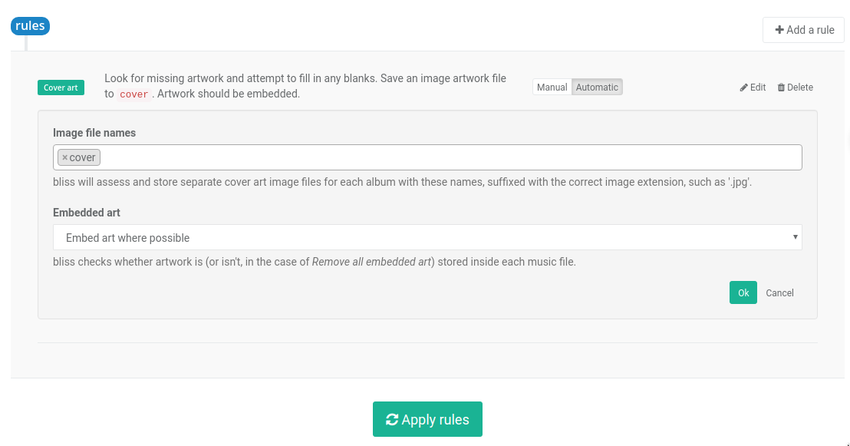
In the new box, there's a list of different nuances that can be applied as cover art rules. The first is the 'Saved artwork filename'. bliss saves a co-located cover art image file in each album directory. This is the first part of the file's name, the second and final part being the image type extension, such as .jpg, .gif etc. Common settings for this are 'folder' or 'cover' which result in 'folder.jpg' or 'cover.jpg' or similar.
Next, there's 'Embed cover art in music files'. Embedding art is, I believe, generally a good thing. I would suggest leaving this on 'Embed art where possible', but choose 'Ignore' if you prefer. If you want to eradicate all traces of embedded art, choose 'Remove all embedded art'.
The 'more' link reveals some more detailed rules such as art sizing. Take a look at them, but we won't work with them for now (and you can always apply them later!).
Now, click the 'Apply rule' button and bliss begins the assessment and automatic fix cycle.
Assessment of cover art and automatic installation
Now you have applied the rules, bliss is assessing each album against the rule and, potentially, automatically fixing what it can.
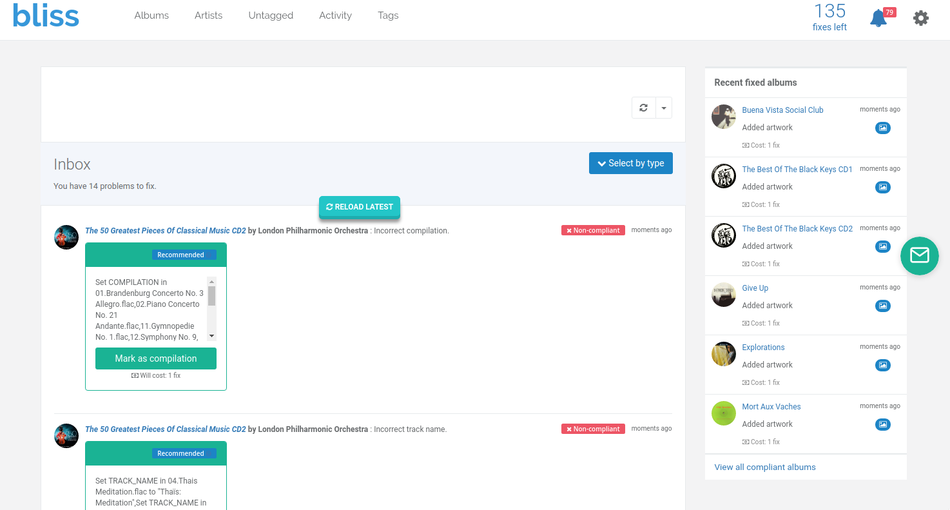
The album overview page in bliss shows each album, ordered by name, in a grid. Once the cover art has been recognised this will be shown, otherwise a CD case with no cover is shown. While bliss is assessing an album, it is marked 'Unknown'. This changes to 'Compliant' or 'Non-compliant' once the results of assessment against your rules are returned. Albums can be filtered by their compliance and by the first letter in their name.
So what's happening during assessment? We configured two rules - save the art into an image file with a configured name and make sure art is embedded. If either the image file or the embedded art is missing, bliss decides on an automatic fix to (in order): (1) re-apply any existing art (for instance if the embedded art exists but the image file doesn't: save the embedded art into the image file) or (2) download art from the Web. The fix is run (this costs one 'fix' in terms of licensing, per album) and hopefully the album is now 'Compliant'. If there was no art to re-apply and there was no art found on the Web from trusted sources then the album will remain 'Non-compliant' and you should choose your own cover art from a wider range of possibilities (we'll come to that later!).
The assessment/fix cycle runs for all albums on initial startup, and then whenever an album is either changed or added.
How long does it take? It depends on the rules. For instance, for the cover art rule there are two main sources of slowness: (1) embedding art tends to take a long time, depending on the speed of your hard disc or network if mounted and (2) performing Web lookups are throttled to avoid excessive calls to friendly free music databases such as MusicBrainz and Discogs. Generally, on my home server I see about one album scanned per second on average, but this is not necessarily a representative sample!
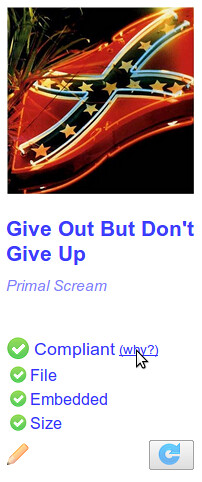
Once an album has been fully assessed and has been marked either 'Compliant' or 'Non-compliant' you can find out why by hovering over the album and clicking the 'why?' link. This expands different parts of the assessment, which generally relate to aspects of the rules you configured. For instance, the assessment for the co-located file is separated from the assessment for embedded art. You can click on any of these to see more detail about the individual assessment.
Changing art manually
Once the assessment is complete and any automatic fixes applied you can change the art for an album manually. Click the change art icon (the one that looks like a pencil), or one of the assessment parts exposed by the 'why' link. You will be taken to the 'change art' screen.
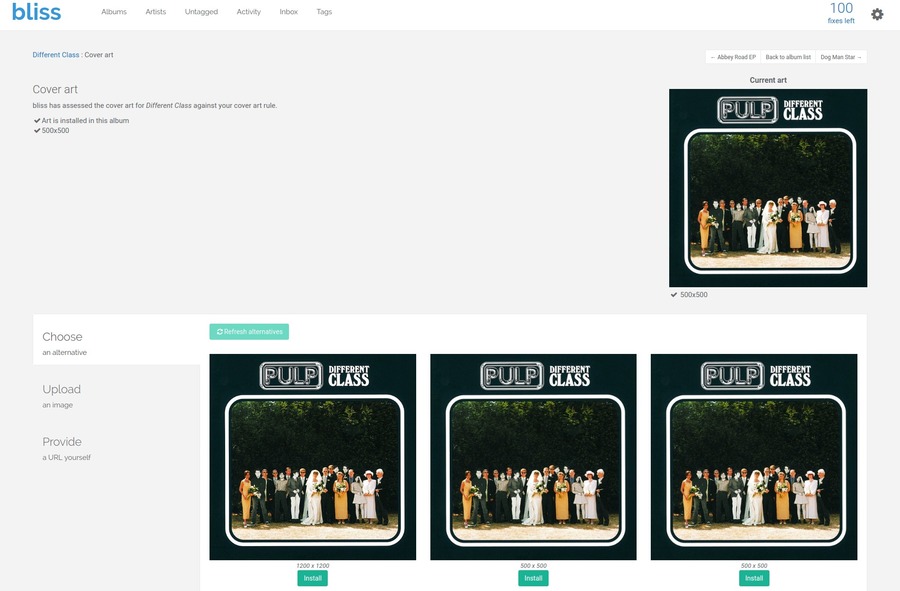
The change art screen allows you to choose art bliss has found from different sources. When you access the change art screen bliss immediately starts to download these alternatives; it takes a few seconds because of the throttling described above. Art is looked up on the MusicBrainz and Discogs databases and also a more general search via Google; this can be useful for rare recordings or bootlegs. Sometimes it also shows up generally applicable images you may want to use, such as an image of the artist, band, orchestra or similar. Click on any image to zoom in, and click the 'Choose cover art' button to set the art for this album. bliss makes sure the art is saved in accordance with your cover art rules, i.e. embedded and in a file called cover.jpg,png,gif or whatever.
There's also an option to provide a URL manually. Click the 'Provide' link and enter the URL. Note: it is possible to use a file based URL for this in the form:
file://path/to/image/file... as long as bliss has access to this URL (if bliss is running on a separate computer and you provide a file URL, the file must exist on bliss's computer).
This concludes the First steps... tutorial. Hopefully you've learnt a little about how bliss works and what you'd expect to see when you use bliss. The next step is to download bliss and begin fixing your cover art!